HAPPY HOLIDAYS!!!
from all of us at Keepsakes
May your holidays be full of joy and cheer
and spent with friends and family dear.
from all of us at Keepsakes
May your holidays be full of joy and cheer
and spent with friends and family dear.

![]()
written by Susan Beth Breuner
Every third Monday of the month a Scrapbooking Book Club meets at Keepsakes. We've changed our format from using pre-assembled books and kits from a third-party company to selecting our own books or magazines and producing something that was inspired by the book. Below are a few results from this month. Lots of fun. All of these projects were inspired in one way or another from the book "The Foof~a~Life" published by Autumn Leaves.
First is my project, a mini tag book with a Christmas theme: The handwritten words are from the first and second chapters of the Gospel of Luke.
 I used a stamp of the baby in a manger on each page, although it is difficult to see here.
 I had grand hopes of making eight or nine of these books for Christmas, but don't get your hopes up, because it just didn't happen. Maybe another year.
 Those are Rosie's hands as she shows us the dimensional aspects of the flowers she hand cut for this page. The folks in the photo are her parents and other relatives, many of whom have passed away - great job of getting them documented so future generations will know a little about them.
 You can see some more of her cut work in this photo.
 And here you see the interactive journaling block.
 Love the layering of the clock transparency over book paper with the glitter heart topping it off.
 The thing that inspired Barb was to run the title up the left side of the page. Very effective!
 This project by Jan Astrom is really wonderful! She has a whole story about how the man featured in this project is an ancestor of her husbands, who was a famous shell collector - the photocopied pages from a book are about him and his excellence in shell collecting. Pretty neat family history.
 She mounted all of this on a painters canvas - beautiful job!
 And the shells are shells that were actually part of the ancestor's collection! Wow! What a family heirloom she has created!
![]()
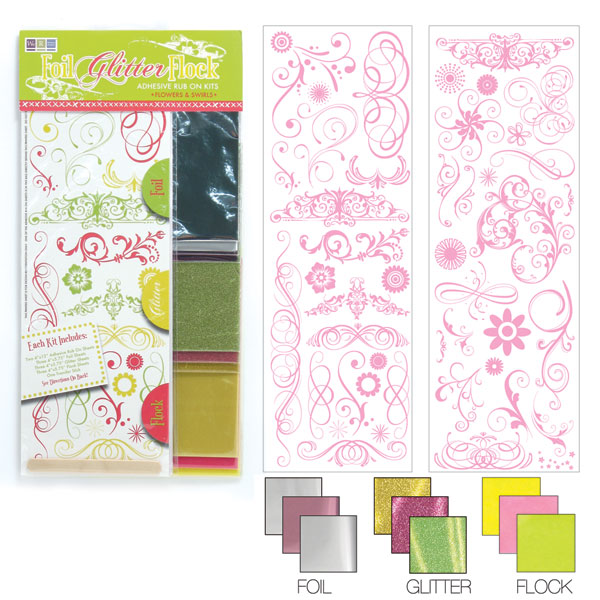
Have you seen these We R Memory Keepers sets at Keepsakes? I picked one up a couple weeks ago and have had an absolute blast playing with them! They are amazing. The kit consists of two pages of adhesive rub ons and 3 sheets each of foil, glitter, and flocking to use with the rub ons. If you've ever wanted to try gold foil or flocking and have been intimidated - this is for you! It's practically fool proof and comes with instructions to get you started. These rub ons work well on cards, layouts, photos - you name it. It's definitely worth a look. I know I'm hooked on them.
![]()

When you want a project to come together quickly, or you need to whip up a gift album last minute, the easiest way to get it done is with coordinating products. K&Company excels at providing you with lots of products in perfectly coordinating lines. They have everything from patterned papers to epoxy stickers to metal brackets and hardware to chipboard letters to vellum quotes to mat stacks to to rub ons to dimensional stickers... They have it all! They even have matching albums so your projects come together in a snap! Make coordinated albums ready to fill with pictures and give them as baby or Christmas gifts. You can't go wrong!!
 papers

![]()
 Every project requires some foundational elements in addition to the glitz and glam of patterned paper and embellishments. And while choosing the glitz and glam is often more fun than choosing the basics, the latter is often what makes or breaks the finished product. It is just as important, and maybe even more so, to carefully select the unseen or accent materials for a project as it is to choose the right focal piece. So before you begin a project, take a moment to think through the details and the whole project will turn out better. Here are some things to consider:
Foundation
![]()
![]()

Did you see the Hambly Christmas rub ons on the holiday wall at Keepsakes? Great for tags, cards, or scrapbook pages! As with most Hambly products, the possibilities are practically endless... Like this amazing card from the Hambly blog:
![]()

With a few basic ingredients, you can cook up a marvelous Christmas card in no time! These cards are simple to mass produce, but have beautiful layers that give this card depth! Makes 12 cards.
What you need:


![]()

The Winter '08 edition of Scrapbooking & Beyond just hit the newsstands and... it features 3 pages on our very own SUSAN BETH BREUNER!! They published her one of her acrylic albums. Congratulations, Susan Beth!!
![]()
![]()
If you haven't stopped by Keepsakes to see the new S.E.I. Holly Lane papers, you don't know what you're missing! They're new and they're FABULOUS! And while the pictures are nice, they just don't do justice - these papers are laced with gold foil, so you've got to see them in person to appreciate it!


![]()

Acrylic albums are hot right now, and this album is BEAUTIFUL. So beautiful, in fact, that when Susan Beth submitted it to Scrapbooking and Beyond they picked it up for publication right away!! If you missed out on this class at the retreat, you'll want to be sure to sign up for this offering before it fills up!
Snow Acrylic Album
Saturday, December 1st
1:00 - 4:00 pm
$25

![]()
With Thanksgiving just passed and Christmas quickly approaching, now is the time to get cracking on those holiday cards!! Check out the new holiday papers from Heidi Grace (used on the cards below), Basic Grey, and SEI. They're amazing!! If you need some ideas, browse the display cards for some inspiration or pick up one of the new cardmaking magazines. And if you still feel like you need some help, sign up for Wednesday's class! You'll learn how to make 6 cards from a single piece of patterned paper (plus cardstock and a few embellies)! Here are the cards you'll take home, plus detailed instructions for mass producing more.
6 Cards - 1 Paper
Wednesday, November 28
6:00 - 8:30 pm
$18


![]()

Do you like the look of hand stitching but are too afraid to do it yourself on layouts and cards? Your solution has arrived... The new In Stitch'z templates by Bazzill are in at Keepsakes! There are TONS of designs to choose from as well as a piercing mat and color coordinated floss sets, too. Susan Beth just taught a class on how to use these amazing templates. If you missed the class, you'll want to stop in and see her cute layouts and pick up some templates to try yourself. If you attended the class, you already know how cool these things are!
Each template set comes with four separate cards that can be used over and over again. Floss sets come with 6 different colored flosses (48 yards total) and two needles.
The piercing mat is 12.5 x 6.5 inches and is perfect for use with any sort of paper piercer.
If you feel like branching out once you've tried In Stitch'z and want some more inspiration, check out this tutorial on hand stitching. She uses stamps instead of the templates, but has some great ideas for incorporating multiple thread colors, brads, flowers, and more.
![]()
Have you seen the new Pop Culture line by KI Memories?? The papers are vivid and beautiful, the jelly embellies are fun, and the lace cardstock... it's to die for!! If you haven't seen it yet, you don't know what you're missing. It's sort of Queen&Co felt ribbon meets 12x12 cardstock. It's truly amazing. You can see all of the frosty papers here, and the gorgeous lace cardstocks by KI Memories here. These beauties arrived at Keepsakes today:
![]()
Don't forget that the Fall Retreat is only a week away!! For the class schedule and details, contact the store. The class kits are piling up in the workshop and they are just full of marvelous goodies!! You won't want to miss it!!
2007 Fall Retreat
November 9-11, 2007
![]()
It's hard to believe that November is upon us already! To kick off the new month we have these classes offered:
Paper Tearing Class
Saturday, November 3
1-3 pm
$20
Create a two-page layout and take your paper tearing skills to the next level. Learn how to layer, age, and roll your torn edges for a unique effect.
Holiday Tag Picture
Thursday, November 1st (6-8pm)
or Saturday, November 3rd (10-noon)
$20
Create a beautiful piece of holiday wall art in this class. Use stamps, inks, photos, papers, and embellishments to make a unique decoration or Christmas gift!
![]()

Scrapbooking materials can be used for so much more than just scrapbooking. Given the variety of designs and motifs available in paper alone, scrapbook art is well suited for home decor. This idea from Dow Industries showcases the classic look of canvas with any scrapbook paper you love. ScreenPrints by Hambly are featured in the photo above (check out the selection of Hambly ScreenPrints available from Keepsakes sometime - it's one of the few scrapbook stores that actually carry this awesome line!), but any 12x12 scrapbook paper would work for this easy project. Here's is Hambly's own Allison Kreft's take on the project. It's a great way to create inexpensive, customized art for a nursery, child's room, or your living room. The possibilities are almost endless, so start thinking outside the {scrapbook}.
![]()
Cropping images is fine and good, but sometimes you want to get a quick page done using the prints as they are - in 4x6 format. In this class, Susan Beth will teach you some formulas for making the most of those photos! Make a two-page and single-page layout and learn some new techniques along the way! This class is offered twice, so choose the one that works best for you!
Tuesday, October 23 6:00-8:30 pm $20 Saturday, October 27 10:00 - 12:00 noon $20

![]()

Looking for a great Christmas gift? Or maybe a new place to organize your life? This note holder is perfect!! You choose the papers to suit your taste and the rest is done in class! Leave with a finished project and cross one more thing off your list.
Monday, October 22nd
6:00-8:00 pm
$18
![]()
